Pages

Showing posts with label Martha Stewart. Show all posts

Tuesday, 5 February 2013

How I made my Texture Paste Layout


For the month of February we have been playing with Texture Paste!
Here is a reminder that we are scraplifting this beautiful layout by Heather Jacob

this is our sketch 

I used Kaiser Craft papers from the Periwinkle collection.
Ash Bazzill and some clear crystal gems.

Here is a brief description of what I did:

I kept the Ash Bazzill whole to make a firm base for the whole layout.
With 'Dawn' paper I punched down the right side with a border punch, then tore the other three sides so the finished piece was about 10" x 11".   I took the left over strip, turned it over, trimmed the ends so it was a little shorter than the first piece and place to left tucking it under the larger piece slightly.

Next I took the 'Whisper' paper and tore two strips approx. 3/4" x 10". This was placed horizontally across the layout under the photo.

With 'Hint' paper I trimmed one side with a deep edge border punch to create a lacy pattern. Then I cut a piece about 9 1/2" and added it just above the two horizontal strips of floral paper, setting the remainder aside for later.  I tore a piece - bird side up - about 1 1/2" x 9" which was tucked in vertically over the left side piece of black patterned paper and slightly under the main peach piece.

Next I made a tear up from the bottom on the right side and folded it back. Then I tore a scrap from the blue dot side of the 'Whisper' paper and tucked this under gap. I added a short piece of the left over lacy border punched earlier. I repeated this with a smaller tear low down on the left side and tucked under a torn piece of floral side of 'Whisper'. I tucked in a punched leaf frond using the black side of 'Hint' paper into the gap.

After inking all the torn edges I lightly stuck them in place. I decorated them with the sewing machine and some cream and black threads.  I further distressed the edges up to the stitching.

Using texture paste and mask I added some harlequin shapes to the top left area of the layout.  After allowing this to dry I inked it slightly to highlight the shapes, and texture.

I cut my photo mount from a plain peach area of 'Breath' paper.  I made a selection of label shapes in different papers and sizes cut using the Cricut and punches - these were cut up as only small amounts of each was needed to peek out from under the photo. I inked the edges and drew round the shapes with a pen.  After building up the arrangement I stuck everything in place.

I used Sizzlets Tattered Flower Garland decorative strip die, and cut leaves and flowers using 'Breath' paper. I used leaves from the aqua side and the flowers from the peach side.  I inked the edges of all these shapes, scrunched them up and stuck them in place. I added a gem to the centre of each flower.

I cut my letters for title with Sizzlets Typeset decorative strip die and stick this to the bottom left of page.

From the manufacture's strips at the bottom of each paper I cut three flags about 2" long. These were added to the right of the photo. about 1/2" apart. Three x 1/2" punched circles from some peach paper were inked and added to left of each flag with a 3D pad. A gem was added to each circle and coloured with sky blue Promarker. Then I added three more circles and gems to the top of two horizontal strips of paper. These were coloured with a spice Promarker. 

Finally I added a gem to each tear.

Thanks for looking.
Please pop over to A Moment In Time to find out more about my layout and other projects.


Wednesday, 5 December 2012

How I made My Monochromatic Page - Petite Bebe


Here is some detail about how I made my layout for December's challenge.  We are challenging you all to create a Monochromatic layout by scraplifting the work of Pam Thorburn here blog can be found HERE.


This is a reminder of her original layout

this was our sketch.

I stuck with the white for my colour scheme, but chose a coloured photograph of my daughter Catherine taken in June 1992 when she was about 10 weeks old. I loved this little romper suit I brought for Catherine, with it's pretty floral print and smocking. It's one I kept and she now treasures.

I used a sheet of Dotted Swiss Bazzill in Salt as my base. I then used a sheet of white Bazzill and cut the following from it:
Two circles - one 3" and one 4" (I used George and Basic Shapes Cartridge and the Cricut)
A scalloped square 5" (I used Cindy Loo Cartridge and the Cricut)
Two Garden Branches using the Marianne Design die and the Big Shot
Three Catalina Wreaths using the Memory Box die and the Big Shot
Two Kaleidoscope Butterflies using the Memory Box die and the Big Shot

With scraps of the white card punch:
Twice with the Martha Stewart 3 in 1 butterfly punch
Twice with the Martha Stewart 3 in 1 hydrangea punch
Four times with the Martha Stewart frond punch

Take the circles and run through the Big shot using the Cuttlebug Elegant Birds embossing folder.
Trim 1 1/2" from one side of the scalloped square and run this through the dandelion embossing folder.

I printed the photo to the size of 4" x 6" and then used my 4" circle as a template to cut the photo.

Then I arranged the circles, scalloped square and photo on the background, adding a doily under the photo. This was all stuck down into position. I arranged  the two Catalina wreaths overlapping one another and the embossed circles, these were stuck down in just a few places with a sticky foam pad under each of the larger flowers, thus leaving the wreath free to appear to be hovering off the page. It also allows for other items to be tucked in place later.

Add the two large Memory Box butterflies  one to the top right of the page and the other to the left of the larger circle - only sticking the bodies to the page so the wings are free. Add a few of the smaller butterflies above the latter in the same way.

Stick a strip of DST from the bottom centre of the photo out to the right of the layout to end at the edge of the the scalloped circle. Stick white satin ribbon over the tape pleating as you go.

Stick the two Marianne Garden Branches to the page one to the left of the ribbon reaching out to the left, the other from the bottom centre of the photo, trailing to the bottom of the layout, slightly over to the left.

Now to destroy the blossoms and leaves - Maw ha ha ha! Take the wires and any green leaves and yellow stamen off! Arrange a selection of flowers onto the page with the larger ones nearer the photo trailing down in size towards the left corner of the page. I used two white wires from the leaves to extend from the flowers, adding tiny roses at the ends and some small blossoms halfway down.
I added some petal shapes from the 3 in 1 Hydrangea punch over the centre of some of the flowers where green or yellow bits still showed, layering these up where appropriate. Add some punched leaf fronds here and there.

I added a blossom, two punched fronds and a tiny rose to the right hand end of the ribbon.

I curled up four white wires to add as tendrils from the blossoms. Also add the silk leaves.

Use flat backed pearls to add centres to some of the blossoms.

With White Opal Liquid Pearls add tiny dots around the large circle and some slightly larger dots around the scalloped edges of the square. I then added some random dots to the branches and the wreaths.

Finally cut the title in white Bazzill using Lucy QuickKuts alphabet dies. Stick to the bottom right of the layout. Highlight the title with some Glossy Accents.

Pop back to the post titles ' M is for Monochromatic' published on 1st December for more details of the challenge and the prize and to see what the rest of the DT created.

Thanks for looking
Lynn x

Monday, 5 November 2012

How I made my November Layout - Crazy Girl

A reminder of my page for the November Scraplift challenge.


This month we are scraplifting the lovely Lou who is a fellow design team member. This is her original Layout.

Here is our sketch

Here is how I made my page:
The papers are from My Mind's Eye, The Sweetest Thing - Honey Collection
Gut the gold Bazzill to give me a frame 1" deep (12" x 12").

Trim the bee patterned paper to 11" x 11". Gut some of the cream paper from under where the photo mat will be placed about 3" x 3". Also cut the lettering strip 'One of a Kind' from the background and set aside. Stick this paper centrally over the gold frame.

Cut the floral paper to measure 6" x 4" round the corners and stick to right of honeycomb and roses detail.

Cut chicken wire to measure about 8" x 5" and attach to page with the two decorative brads near the top corners.

With four small photos, stick to white cardstock to appear like a photo-booth strip. Stick to centre of wire with 3D foam pads. 

Using the Cricut I the Journalling plates and mats then stuck as shown to the left of the photo with 3D foam pads.  (All cut using the Lacy Labels cartridge. Cut in Cream 'To From' @ 3", Cut in Gold 'To From Shift' @ 3", Cut in Cream 'Hugs' @ 3", Cut in Pink 'Hugs Shift' @ 3". Also cut in Floral 'Welocme' @ 1 3/4", Cut in Gold 'Welocme shift' @ 1 3/4".)

Cut a bee in black cardstock and add to bottom of plates (Cut with Home Decor Cricut cartridge).

Punch a flower from the gutted paper, honeycomb side up, ink and curl petals and apply on top of title block to the right side with a sticky fixer pad. Cut title and add this over the top of the flower. (I used the Cricut and the 'Paisley' cartridge to cut the word  'Crazy'.) Apply off the edge of bottom right of wire using 3D foam Pads.

Make some clay flowers using Fimo Light and a Martha Stewart mold.  When dry paint these with the pink and yellow acrylic paints and glaze. Arrange on layout, sticking down with 3D foam pads or wet glue. Decorate these with the wired leaves, curling the wires round a pencil as you go.

Add some journalling by cutting patterned paper into 9mm strips to feed through the Dymo gun. cut into short lengths sand to reveal the white core where the letters are, then ink. Stick in place over the journalling plates.

Pop over to my blog for more information to see what the rest of the design team created and for more details of the challenge and prize.

Friday, 5 October 2012

How I made my Rainbow Layout I

My layout for this month's Challenge uses the technique of Rainbow Colours. I chose to make mine into balloons as the theme brought to mind the film 'UP'. The photo is Andrew in his beaver uniform - my own little Russell!


This is the original layout we are scraplifiting by Steph Devlin.

and this is the sketch

I used a sheet of My Mind's Eye paper from Good Day Sunshine Collection called 'Head in the Clouds'.
Then I gathered together enough scrap patterned papers from a box under my desk, in each colour of the rainbow to make my balloons. These were mostly Basic Grey Lime Ricky & Lauderdale and Sizzix papers. The shapes were all cut on the Cricut using the Create a Critter Cartridge.
Select the snake,with shift, real dial and layer 1. Cut these in various sizes from 1.5" to 3.5".

The balloons were all inked with appropriate coloured chalk inks and added to the page, some raised on 3D foam pads, others stuck down to the page.

Then I added Baker's Twine in corresponding colours - I tied this to the balloon and stuck down to the page under where the photo would go later.

The photo was mounted onto black Bazzill and the bottom trimmed with a Martha Stewart border punch.

The title was created with two alphabets. The 'UP' is American Crafts - Remarks Letter Sticker - Runway in white. The tiny letters for 'growing' and the date are Doodlebug Designs inc. Simply Sweet Lily White rub-ons.

Hop on over to the 'R is for Rainbow' post if you want to learn more about the challenge and take part.
Challenge runs until 5th November.

Thanks for looking.
Lynn x

Sunday, 26 August 2012

How I made my 'N is for Netting' Layout III


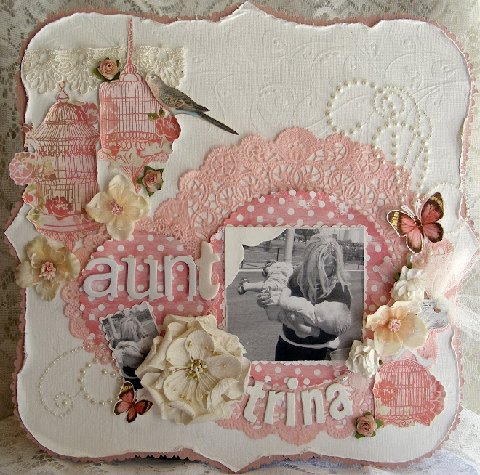
This formidable looking character is called Eliza Sharp and she is a distant relative born in 1836. I discovered her through my family tree research via Genes Reunited and was sent this photograph.
I decided to make a layout with the photo as my page for the August Design Team this month.

We are scraplifting this delightful layout by 2Dogs


I used Webster's Pages - Everyday Poetry collection - die cut, Glorious Day and Little Bird Told Me.


and a piece of brown lace trim from the same collection

And this is what I did:
With the die cut paper and Douglas Fir Bazzill, I cut and added strips of cardstock around the edges and trimmed them with scallop edge scissors.  
I cut images from patterned papers, choosing all the cages, 2 butterflies, the bird, blossom branch and the butterfly chart.
From the rest of the Little Bird paper I cut 2 circles – 4” and 5”. Then I cut 2 more circles from Scout Card about 1.5” bigger than the others. I used a Martha Stewart corner punch to decorate the Scout circles, creating a lacy edge.  
I inked the circles and mounted paper circles onto card circles then placed them on to the layout where required. I mounted the photo over larger circle.
I stuck a 3” strip of lace to the top left corner and ‘hung’ a cage from it – using 3D foam pads to attach to the layout. Then added the other cages to the bottom right of the layout. Then I arranged the other items to the page. 
For each net bow, I took a 12” piece of netting and tie in a bow and stick to the page with glue.I cut the lettering with Cricut and stuck to layout.

Finally I decorate the lettering and scalloped border with the mint green liquid pearls, adding little dots to create the effect of a pearl swirl over the top right of the photo and onto the layout.

some close up photos:


.


The second bow. 

For more information please go the the 'N is for Netting' post.
The challenge runs until 5th September.

Thanks for Looking
Lynn x

Sunday, 27 May 2012

How I Made My May Layout III


My children dressed for Victorian Day at Primary School back in 1999

This is my second page for the Scrapology May 'C is for Charms' challenge.

This is the pretty layout we are scraplifting by Karola Witczak


 Here is our sketch 

I used papers from Kaiser Craft's Sweet Nothings collection.
The stripe paper is called 'All Yours', and the beige patterned paper is called 'Devoted'
The music print is called 'Sincerely'
Green print is 'Love Letters'.

Use a sheet of cardstock as a base, this will be completely covered, so don't worry about the colour.

Cut 2 strips 12" x 2.5" from the striped paper, ink the edges and stick to top and bottom of base card.

I cut the Devoted paper to 9.5" x 12" and trimmed the 12" sides with a Martha Stewart border punch. Ink the edges and stick centrally to base.

Cut the photo mat from music paper the same size as photo. Distress both photo and mat, ink the edges and mount off set onto layout, don't stick right down as other bits need to be tucked underneath later.

Use the Big Shot and cut the clock face from cinnamon Bazzill cardstock and add to page.

Cut title from pink side of 'Love Letters' paper and shadow from Suguaro cardstock - I used the Plantin Schoolbook Cartridge.

Cut leaves from Storybook Cartridge and green side of 'Love Letters' paper and add to layout with some pre-made roses. The butterflies were cut from the 'Love Letters' paper and glittered with Stickles. I added metal photo corners, and some charms.

I added a buckle charm to a length of brown gross grain ribbon and attached over the bottom of the photo.

The book plate was made using the Fabulous Find cartridge and I added some flat backed pearls.

Thanks for looking, and please take a look on the 'C is for Charms' post of 1st May see what the rest of the DT came up with and the details of the challenge and prize.

Saturday, 5 May 2012

How I made my 'C is for Charms' Layout

Here is what I did for this month's scraplift challenge - we are challenging you to use a few charms on your layouts. See 'C is for Charms' posted on 1st May.

The photo is my mother-in-law Rhoda standing outside the house next to her treasured clematis - Nelly Mosa. May 1984

A quick reminder that we are scraplifting this gorgeous page by Karola Witczak

and here is our sketch


I used these lovely products:
1 Sheet Cream Bazzill cardstock
3 x 12” x 12” Patterned Papers - Basic Grey Kissing Booth – Kiss, lip lock and butterfly kisses


Key and clock charms from Kitty Pink and a dragonfly charm from Wild Orchid Crafts
A mix of pink and white hellebores, sweetheart blossoms and gardenia from Wild Orchid Crafts
Pearl beads, pink green and white
How I made my page:
Cut two strips of ‘butterfly kisses’ to 12” x 2.5”, stick this to top and bottom of cardstock.

Cut ‘kiss’ to 12” x 9.5” and trim long sides with deep edge punch. Using the side you don’t intend to use for the layout lay along the pink strips and dab with ink using the paper as a mask.
Flip lace edged paper over to the right side and stick horizontally to centre of the layout overlapping the borders.

Cut a photo mat from pink scraps, and music paper the same size as the photo and mount the mat and photo off setting them from one another.

Cut ‘Weathered Clock’ face using Tim Holts die and Big Shot.
Stamp a Stampin’ Up ‘Sense of Time’ clock face.
Stamp a journaling block onto a plain light coloured paper scrap. Add this to the centre left behind by cutting the clock face. Add journalling.

Cut a ‘Madera Corner’ using Memory Box die and Big Shot.
Punch a butterfly with the Martha Stewart punch.

Make some layered flowers by cutting tattered flowers with the Big Shot from music paper and add pearl beads to the centres.

Arrange all these die cuts and the charms and flowers over the page. When happy with the arrangement attach everything to the layout.


Thank you for looking and please pop over to my blog for more of my layouts and cards.

Wednesday, 18 April 2012

How I made my April Layout II - Little Miss

Me!


This month we have scraplifted this beautiful layout by BettyLou1 and the theme is to use lace of any kind on your layout.


This was our sketch

For this DT layout Basic Grey 'Hello Luscious' collection

inviting

raspberry syrup

simply grand


Cut the Raspberry Suryp paper until it was about 11"x11", distress and ink the edges and mounting centrally ont the Bazzill.

Cut three strips from Simply Grand paper 1.5"x10", and three strips from the vanilla side of Inviting 1.75"x10.25".  Distress and ink the edges of al six strips, mount the coloured strips centrally onto the vanilla strips. Arrange these strips vertically on the layout about 0.5" apart.

Cut some 6" circular shapes - I used my Cricut and the Striaght from the Nest cartridge and cut the lacy shape from pink Bazzill and the shadow from cream Bazzill. Ink both shapes and layer the pink on the cream and position to the right of the layout as shown.

Make a mount for one corner or the photo from cream Bazzill and trim with Martha Stewart round the page punch in a lacy style. Distress and ink the edges of the photo and stick to mount. Ink edges of mount and stick mounted photo to layout, leavng the very bottom unstuck, for trimming later.

Cut a strip from grid side of Invitng 10.5"x 3. Distress and ink then trim along the bottom long edge with antique style lace. Mount acoss the bottom of the layout about 2" up from the bottom, tucking under the photo. Stick the velvet ric-rac along the length of this strip, over the photo and tuckig the ends under the paper at either end.

Tie a bow with a piece of sheer organza ribbon to the right side of velvet strip.

Decorate the big circles with a selection of flowers from. Add buttons to the centre of these flowers stitching in place with DMC thread, tie in a knot at the front of each button. decorate further with loops of narrow satin ribbon and a wired crystal spray.

Add a small title by printing onto vanilla side of patterned paper and punch with oval SU punch. ink and layer onto another scrap of patterned paper punched using the SU scalloped oval punch, ink and attach with 3D foam pads to top left of photo.


Thanks for looking and reading, hope you will take part in this challenge. Pop back to the April challenge entitled 'L is for Lace' or to my blog for more details.

Friday, 8 April 2011

How I made my April Challenge Page


Here are a few tips for making the April page, if you want to create something similar to my page.


This is the sketch I drew from the original layout by Sarah Youde.

I purchased the papers and stamps from Paper Maze.


The stamps are Technique Tuesday and called 'message in a banner'.
The papers are by Girl's Paperie.

The background is diecut newsprint and is single sided, the other two are vintage patchwork and shabby flower and they are both double sided, giving me five patterns to play with. In fact many more than five as the patchwork sheet has many designs on it, which was great for the purpose of different patterned flags.


I cut the horizontal bad from the blue side of the patchwork piece making sure I was keeping the patterned bit from the other side that I wanted for the flags. It's worth taking a little time with this to get the most from your sheet of paper. I trimmed the edge of this strip with a Martha Stewart border punch.

I cut the tickets using the Tim Holtz Alterations Ticket Strip Sizzlits Decorative Strip Die and decorated each ticket with 'Just the Ticket' stamps produced by Imagine That.

The flags were made by stamping directly onto my layout. I drew a light pencil line first as a guide as to where to place the stamps. Then I stamped the flags again onto the patterned papers on the patchwork paper. They fit beautifully inside the squares. These were cut out minus the frilly edge and attached over the flags on the layout with 3D foam pads to raise them off the surface of the layout. I then added in stitches by hand using DMC embroidery thread.to link the flags together.

There is a brilliant tutorial for making the cabbage roses from paper swirls created by Gabrielle Pollacco and it can be found HERE.